|
~Sand Between My Toes~ This tutorial is for those who have working knowledge working in Corel-Paint Shop. I use PSPX. This tutorial used a beautiful PTU Tagger Kit from Created By Jill called: Sand Between My Toes This kit is available in the Stargazers Scraps Sand Between My Toes Collab from June 15th-July 14th. You can purchase this or receive as a free gift w/purchase at Stargazer Scraps: HERE Please visit her blog to see more of her creations! Created By Jill: HERE *Tube: Robin by Zebrush This is a paid to use Tube and must be purchased with a license. Available at Pics For Design. You can purchase this fabulous artists work: HERE *Font: WaterBrushROB. This is a PTU Font and can not be provided. Any paint brush cursive style font will do. *Filters/Plug Ins: Eye Candy 4000-Gradient Glow, Eye Candy 4000-Shadow Lab and Xero-Fritillary. *Supplies: (Personal Use Only) Word Art: HERE (Personal Use Only) Mask: HERE Right click and save mask and word art to your hard drive, then hit back on your browser to go back to tutorial. Premade Mask provided is created from a Becky, who's site is no longer around, but it's called: Becky_Mask021. The paper used from the kit is: CreatedbyJill_SandBetweenMyToes_paper05
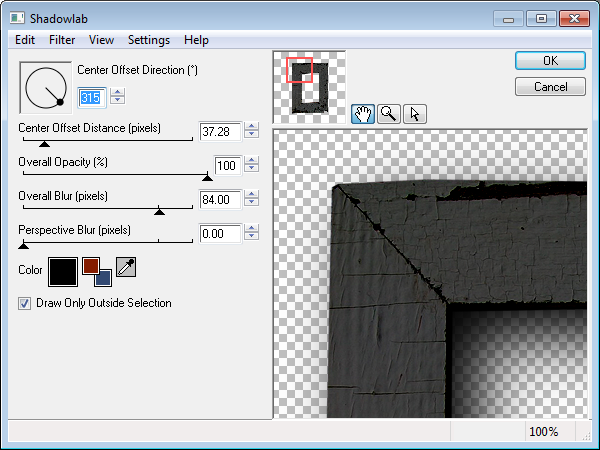
Open up a new 850x850 raster layer. Don't worry about the size, you can crop and resize later. Flood Fill white. Label it your background layer. Copy and paste your mask provided in the supplies as a new layer. It should show above the background layer. Now open Jil's Sand Between Your Toes Sampler Kit Now choose your elements of choice from the kit, I used: the SandBetweenMyToes_sand, copy and paste as a new layer. Resize By 85% Use your pick tool and drag to the bottom of your tag, position at the bottom of your mask layer. Duplicate once, Flip. So you have one at the top. Open up the SandBetweenMyToes_glitterdoodle element from the kit. Copy and paste as a new layer. Resize By 60%. Position on the left. Duplicate, Flip. This layer should be above your sand and mask layers you just worked with. Open up the SandBetweenMyToes_frame1 element from the kit. Copy and paste as a new layer. Free rotate Left by 90 degrees. Darken by -165. Sharpen Once. Add your Eye Candy Filter: Shadow Lab with default settings. Preview below:
Open up the SandBetweenMyToes_greenery1 element from the kit. Copy and paste as a new layer. Resize By 62%. Position on the right of the frame. Duplicate once, Mirror. Drag this one under your frame. See mine to reference. Open up the SandBetweenMyToes_pennant from the kit. Copy and paste as a new layer. Resize by 60%. Use your pick tool and position at the top of your frame. See mine to reference. Copy and paste the SandBetweenMyToes_footprintsborder from the kit. Drag to the bottom of the frame. Resize by 60%. Make sure this is under your frame layer but above your mask and sand layer. See mine to reference. Now Copy and paste a tube of your choice. I used a stunning peice of artwork by Robin by Zebrush Copy and paste as new layer. Drag under your frame layer. Use your point to point pick tool and rid of any excess outside of the frame. *To do this, select all that you want to remove, and hit delete on your keyboard. Then deselect. To deselect, top tool bar, selections, select none. Apply Xero-Fritillary with these settings:
I lowered the opacity (transparency) to 79%. Now copy and paste the tube again. Resize by 65%. Drag above your frame layer. Use your pick tool to position on the right. Now back to your kit again. See mine to reference positions. I used: CreatedbyJill_SandBetweenMyToes_flowers, resize by 60%. Change the opacity (transparency) to 63%. Drag under your frame layer. But above your close up of the tube. CreatedbyJill_SandBetweenMyToes_sanddollar, resize by 30%. Move this layer above your frame layer to the right. Under the top tube. CreatedbyJill_SandBetweenMyToes_shells, resize by 35%. Position over the bottom of the top right tube. CreatedbyJill_SandBetweenMyToes_flower, resize by 35%. Position over the the top tube at the bottom right. CreatedbyJill_SandBetweenMyToes_frame2, drag under all your layers except your mask layer. Use your free hand selection to delete any extra as you prefer. CreatedbyJill_SandBetweenMyToes_umbrella, drag under all your layers, but above your mask layer. Use your pick tool to rotate. Add any extra goodies you might like. Now add your name to the tag, I used font WaterBrushRob. Font size 16, Stroke Width 1. Foreground: #60979d and Background paper: CreatedbyJill_SandBetweenMyToes_paper05 Add Eye Candy: Gradient Glow to your font. Settings Basic: Glow width 3, the rest ad default settings. And Color Settings: Fat Change the Blend Mode to Luminance. Add any drop shadows you prefer to the elements, name, etc. Now add your copyrights and watermark. Crop your tag to get rid of any access space and extras. Then resize to your preference. I usually resize to 85%. Save as a JPG with the white background or hide the main white background layer and save as a PNG (for transparent background) You are now done! Thank you for trying my tutorial! I would love to see your results and are displaying them on my tutorial page. If you would like to share your creation from this tutorial, You can email them here: jessicawoods1@yahoo.com
|

