|
~Mad Hatter~
This tutorial is for those who have working
knowledge with Paint Shop Pro.
*Scrap: this tutorial used Dianna’s with
Digicats (& Dogs) “Alyce in Gothland”
Visit Dianne’s Blog to snag this kit and to shop
with her stores
and see more of her creations: HERE
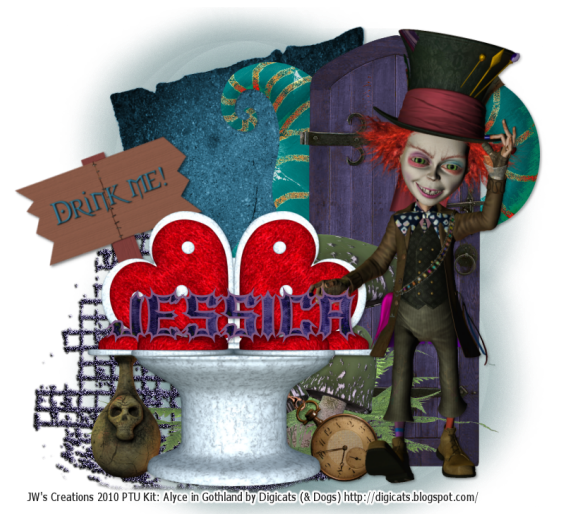
*Tube: The Top Example is a Poser that came
with Dianna’s Kit.
The 2nd Example is a PTU Poser called
Curious Hatter by Joelle’s Designs.
You can visit her blog:
HERE
*Font:
Luciferius. This is a FTU font
and can be found here:
HERE
Please SAVE often!!
Let’s get started.
Open up Paint Shop Pro.
Create a new raster layer, 850x850 and flood fill
white.
Don’t worry about the size as we will resize and
crop later.
Open up your scrap kit Alyce in Gothland and
have ready.
Let’s get started with any elements you might like
from the kit. I used:
DCD_AIG_Mesh01:
Copy and paste as a new
layer.
DCD_AIG_Fractual05:
Copy and paste as a new
layer.
Drag this layer under your mesh and move this to the
top left. Duplicate once, flip.
DCD_AIG_Parchment02:
Copy and paste as a new
layer.
Move to the left of mesh. Free rotate to the left by
15 degrees.
DCD_AIG_Whimsical Tree:
Copy and paste as a
new layer,
resize by 60% and move to the right of the tag
above your parchment.
Make sure this layer is above the parchment layer.
DCD_AIG_Door01: Copy and paste as a new
layer.
Position this above your Whimsical Tree to the right
of the tag.
DCD_AIG_Mushroom02: Copy and paste as a new
layer.
Move in front of the door. See mine to reference.
DCD_AIG_Throne: Copy and paste as a new
layer. Resize by 60%. Move to the left of the mushroom.
DCD_AIG_Potion Bottle: Copy and paste as a
new layer. Resize by 80%. Move to the right of the throne.
DCD_AIG_Sign-DrinkMe: Copy and paste as a new
layer. Resize by 40%. Move under your thrown layer, use your pick took to turn
it some. See mine to reference.
DCD_AIG_Pocket Watch02: Copy and paste as a
new layer. Resize by 55%.
Move this layer to bottom right of the thrown.
Make sure it’s under the thrown layer so it’s
sticking out.
Now copy and paste your poser/tube of choice. For
the top example I used a Mad Hatter out of the kit, provided in the supplies.
Copy and paste as a new layer. Use your pick tool to sit him as if he’s sitting
on the chair.
Now add your name to the bottom of your tag. I used
font
Luciferius
, Size 20, Stroke width 3, Foreground Color code: #7d5981
and Background Color, I used a paper from the kit: DCD_AIG_Paper01 (I set the
scale to 65% for more detail),
then Convert to a Raster and add a drop shadow.
Drag this layer under your tube layer so it rests at
his feet.
For the second tube, in the bottom example I used a
poser called: Curious Hatter by Joelle. I
move the mushrooms to the left, add the tube
to the right of the thrown.
And then added the word art on top of the chair as
if it was sitting on the chair.
Now add any additional drop shadows you prefer to
the elements.
Now add any copyrights and watermarks.
Crop to get rid of any excess white or background of
the tag. Resize to your preference.
Now Save as default (psp image) for later for tag
offers or alterations.
Right Click, Copy Merged and paste as a new image.
Now save as a JPG with the white background, or keep your white background
hidden and save as a PNG. (Transparent Background).
Thank you for trying my tutorial!
I would love to see your results and are displaying
them on my tutorial page.
If you would like to share your creation from this
tutorial,
You can email them here:
jessicawoods1@yahoo.com
|